ChatGPT — Use Cases (Banner Image)
ChatGPT — Use Cases

ChatGPT Completions API and Image Generation

--

ChatGPT’s API, powered by OpenAI, offers developers access to advanced natural language processing and generation capabilities. It enables the integration of ChatGPT’s conversational AI into various applications, websites, and digital products.

In this article, we will integrate ChatGPT in several use cases. From how to set up and configure the connection, to implementing the completions API with chat history, and finally, image generation using the Dall-e-3 model. Let's get started by learning how to configure the connection.

Configuration:

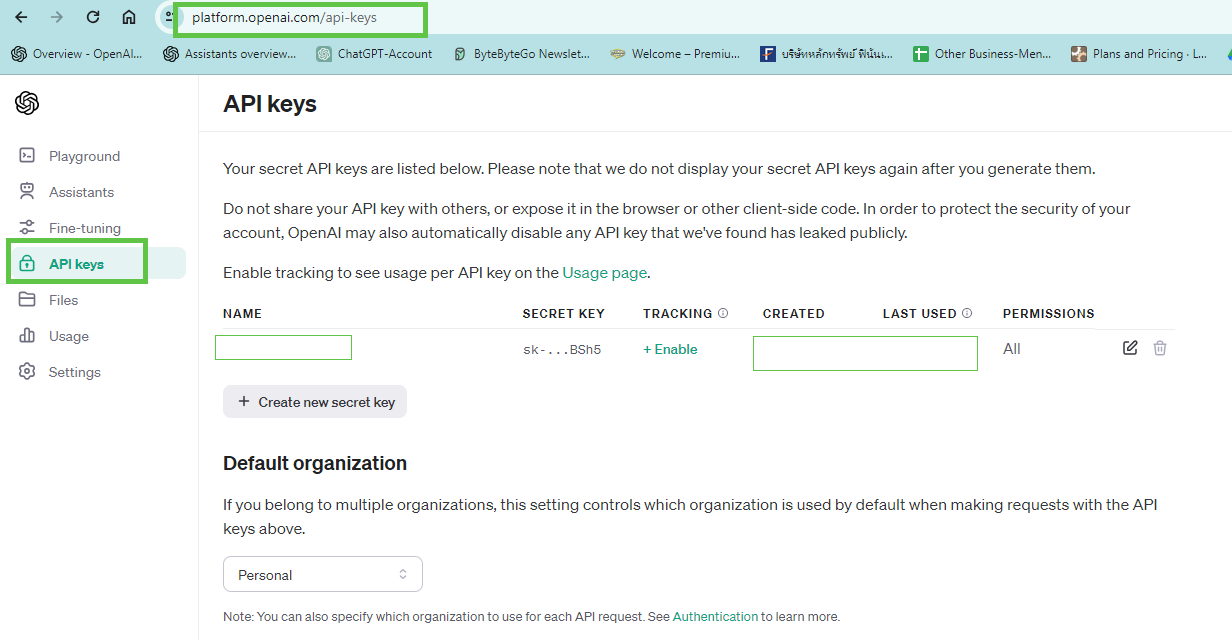
Go to https://platform.openai.com/api-keys to create an API key for integration. This is the API-keys overview in OpenAI’s platform (https://chat.openai.com/), we are going to build an overview in Mendix to store this information to be used in our requests.

In some APIs we need to use organization ID, you can find it at https://platform.openai.com/account/organization

In Mendix, create one entity for storing the token. To make the article easy to understand, I will not validate the token by checking if it exists, and we won't encrypt and decrypt it every time we use it (but you should do this if possible).

Right-click on the Configuration Entity and select “Generate overview pages”. It will quickly generate an overview and new_edit forms.

Put this overview form onto the navigation.

Then you will have a page that looks like this.

Case 1: User message prompt with chat session history.

In Mendix create these entities to handle chat sessions.

On the homepage, we can add links to several pages, one for each different implementation.

For chat completions and responses, we can integrate Chat GPT’s completions API via REST.

Location/Endpoint:
'https://api.openai.com/v1/chat/completions'

Headers:
'Content-Type' :'Application/JSON'
'Authorization': 'Bearer'+ $Configuration/Token

Request Body:

{
"model": "gpt-3.5-turbo",
"messages": [{
"role": "assistant",
"content": "let x = 2 , let y = 3. calculate x + y The sum of x and y is 3. calculate x * y . divide y to x"
}],
"temperature": 0.7
}

Export mapping JSON:

Chat GPT Response in JSON:

{
“id”: “chatcmpl-8rFnMiZVBYTMJXlYZrg2sPIXEyU3z”,
“object”: “chat.completion”,
“created”: 1707702792,
“model”: “gpt-3.5-turbo-0613”,
“choices”: [
{
“index”: 0,
“message”: {
“role”: “assistant”,
“content”: “The sum of x and y is 5. \n\nTo calculate x * y, we multiply 2 and 3, which equals 6. \n\nTo divide y by x, we divide 3 by 2, which equals 1.5.”
},
“logprobs”: null,
“finish_reason”: “stop”
}
],
“usage”: {
“prompt_tokens”: 42,
“completion_tokens”: 52,
“total_tokens”: 94
},
“system_fingerprint”: null
}

Create a JSON snippet using the response structure and then create an import mapping to handle the response from the API.

Import mapping JSON:

In ChatSession_Overview, follow these steps to design the page as shown below:

1- A button to create a new chat session.

2- List of chat sessions. Clicking on the delete icon allows you to delete each item.

3- The history logs between the user and ChatGPT.

4- The prompt message created by users. The send button will trigger a microflow to call the Post Method to ChatGPT.

Let’s discuss the Send action in some more detail. The concept of keeping the history is to send the entire session of questions and answers to ChatGPT plus a new message. Doing this allows ChatGPT to keep learning from the previous question and answer, otherwise the information will not be related to each other. Follow these steps to integrate chat completions (with history)

1- Retrieve the configuration.

2- Check the message content is not empty.

3- Create a new string variable to collect all questions and answers from this session.

4- Retrieve the history that belongs to this chat session.

5- Check whether the history list is empty or not.

6- Loop through the list to add questions and answers together.

7- Define an endpoint url.

8- Create export mapping data to match with the JSON body in the POST method.

The trick is to send the full conversation history + your latest message content in the request body.

9- Call POST Method

Location/Endpoint: 
'https://api.openai.com/v1/chat/completions'

Headers:
'Content-Type':'Application/JSON'
'Authorization':'Bearer' +$Configuration/Token

Request:
///Apply Import mapping as Image shows below///

Response:
///Apply Import mapping as Image shows below///

Post Request

Post Response

10- Extracting the result.

11- Create Role value String.

12- Create ChatGPT value String.

13- Loop to get return role and content (ChatGPT answer).

14- New message content will be added to chat history. This new chat history record will not have a role.

15- The response message from the POST method will be added to chat history with a role as an “assistant”.

16- The final step is to clear the message content.

Demo 1: Math Expert

Demo 2: Product Description Generation

Demo 3: Simplify the text

Case 2: Generate Image.

The endpoint URL for this service is https://api.openai.com/v1/images/generations

In your Mendix app create 2 entities. One for the input string and one for the generated image.

Design a page like the image below.

1- InputContent will be a string in which you want the dall-e-3 to generate an image for you.

2- The generate image button will take the input string as a prompt to use in the POST API.

3- The delete all button is just to clean up all generated images.

4- A list of generated images.

Location/Endpoint:
'https://api.openai.com/v1/images/generation'

Headers:
'Content-Type':'Application/JSON'
'Authorization':'Bearer' +$Configuration/Token

Request Body:
"{ "model":"dall-e-3",
"prompt":"a white siamese cat",
"n":1,
"size":"1024x1024"
}"

Response:
///Apply Import mapping as Image shows below///

Export Mapping.

JSON response received after the POST method executes successfully.

Import mapping for the result.

Post Request

Post Response

Now we continue to build a generate image microflow.

1- Retrieve the configuration.

2- Check the input string is not empty.

3- Create an endpoint url.

4- Create an import mapping.

5- Call the POST method (described above).

6- Extract the first layer of the response object.

7- Extract the data list from step 6.

8- Create an image URL string.

9- Loop to get the URL string and update the value into step 8 variable.

10- Create an object of the $ImageGeneration entity.

11- Using the community commons java action to convert the image URL into a Mendix FileDocument, and store it on the $ImageGeneration entity.

12- Refresh the input string to empty.

13- Refresh the generated image object on the page.

14- Show a success message.

Demo 4: Image Generation.

Read more:

From the Publisher -

Inspired by this article to bring your ideas to life with Mendix? Sign up for a free account! You’ll get instant access to the Mendix Academy, where you can start building your skills.

For more articles like this one, visit our Medium page. And you can find a wealth of instructional videos on our community YouTube page.

Speaking of our community, join us in our Slack community channel. We’d love to hear your ideas and insights!

--

--

QUANG NHAT TRAN
Mendix Community

Certified Mendix Expert MVP, Data Scientist, and Technical Practitioner @ TBN Software